Learning Open3D→Tutorial→上級編→対話的な可視化
Interactive visualization
対話的な可視化
このチュートリアルでは、ビジュアライザーウィンドウのユーザー対話機能を紹介する。
注: 次のコードではdemo_manual_registration関数の assert のところでエラーが起きるので外してある(2箇所)
注意: 作業(カレント)ディレクトリがexamples/Python/Advancedになっていることを確認すること
# examples/Python/Advanced/interactive_visualization.py

import numpy as np
import copy
import open3d as o3d

# (1) Crop geometry
def demo_crop_geometry():
    print("Demo for manual geometry cropping")
    print(
        "1) Press 'Y' twice to align geometry with negative direction of y-axis"
    )
    print("2) Press 'K' to lock screen and to switch to selection mode")
    print("3) Drag for rectangle selection,")
    print("   or use ctrl + left click for polygon selection")
    print("4) Press 'C' to get a selected geometry and to save it")
    print("5) Press 'F' to switch to freeview mode")
    pcd = o3d.io.read_point_cloud("../../TestData/ICP/cloud_bin_0.pcd")
    o3d.visualization.draw_geometries_with_editing([pcd])

# (2)
def draw_registration_result(source, target, transformation):
    source_temp = copy.deepcopy(source)
    target_temp = copy.deepcopy(target)
    source_temp.paint_uniform_color([1, 0.706, 0])
    target_temp.paint_uniform_color([0, 0.651, 0.929])
    source_temp.transform(transformation)
    o3d.visualization.draw_geometries([source_temp, target_temp])

# (3) Manual registration (2)
def pick_points(pcd):
    print("")
    print(
        "1) Please pick at least three correspondences using [shift + left click]"
    )
    print("   Press [shift + right click] to undo point picking")
    print("2) Afther picking points, press q for close the window")
    vis = o3d.visualization.VisualizerWithEditing()
    vis.create_window()
    vis.add_geometry(pcd)
    vis.run()  # user picks points
    vis.destroy_window()
    print("")
    return vis.get_picked_points()

# (4) Manual registration(1)
# Select correspondences
def demo_manual_registration():
    print("Demo for manual ICP")
    source = o3d.io.read_point_cloud("../../TestData/ICP/cloud_bin_0.pcd")
    target = o3d.io.read_point_cloud("../../TestData/ICP/cloud_bin_2.pcd")
    print("Visualization of two point clouds before manual alignment")
    draw_registration_result(source, target, np.identity(4))

    # pick points from two point clouds and builds correspondences
    picked_id_source = pick_points(source)
    picked_id_target = pick_points(target)
    #
    # Registration using user correspondences
    #
    # assert (len(picked_id_source) >= 3 and len(picked_id_target) >= 3)
    # assert (len(picked_id_source) == len(picked_id_target))
    corr = np.zeros((len(picked_id_source), 2))
    corr[:, 0] = picked_id_source
    corr[:, 1] = picked_id_target

    # estimate rough transformation using correspondences
    print("Compute a rough transform using the correspondences given by user")
    p2p = o3d.registration.TransformationEstimationPointToPoint()
    trans_init = p2p.compute_transformation(source, target,
                                            o3d.utility.Vector2iVector(corr))

    # point-to-point ICP for refinement
    print("Perform point-to-point ICP refinement")
    threshold = 0.03  # 3cm distance threshold
    reg_p2p = o3d.registration.registration_icp(
        source, target, threshold, trans_init,
        o3d.registration.TransformationEstimationPointToPoint())
    draw_registration_result(source, target, reg_p2p.transformation)
    print("")


if __name__ == "__main__":
    demo_crop_geometry()
    demo_manual_registration()
このスクリプトは、ユーザー対話の2つのアプリケーションdemo_crop_geometry()とdemo_manual_registration()を実行している。
# (1) Crop geometry
def demo_crop_geometry():
    print("Demo for manual geometry cropping")
    print(
        "1) Press 'Y' twice to align geometry with negative direction of y-axis"
    )
    print("2) Press 'K' to lock screen and to switch to selection mode")
    print("3) Drag for rectangle selection,")
    print("   or use ctrl + left click for polygon selection")
    print("4) Press 'C' to get a selected geometry and to save it")
    print("5) Press 'F' to switch to freeview mode")
    pcd = o3d.io.read_point_cloud("../../TestData/ICP/cloud_bin_0.pcd")
    o3d.visualization.draw_geometries_with_editing([pcd])
この関数はポイントクラウドを読み取り、draw_geometries_with_editingを呼び出す。 この関数は、頂点の選択とクロッピングを提供する。
注意:
Open3Dには、Visualizerクラスを継承するVisualizerWithEditingクラスがある。 これは、グラフィックユーザー対話機能を追加する。 カスタマイズされた視覚化の例と同様に、VisualizerWithEditing()をdraw_geometries_with_editing([pcd])の代わりに明示的に使用できる。
ジオメトリが表示されたら、Yを2回押してジオメトリをy軸の負の方向に揃える。 表示方向を調整したら、Kを押して画面をロックし、選択モードに切り替える。

Tip 領域を選択するための実用的な方法は、正投影モデルを使用してジオメトリを任意の軸に揃えることである。 このトリックは、透視投影による自己閉塞の煩わしさを避けられるので、選択が容易になる。
領域を選択するには、マウスドラッグ(矩形選択)またはCtrl +左マウスクリック(ポリゴン選択)のいずれかを使用する。 以下の例は、ポリゴンを使用して選択した領域を示している。
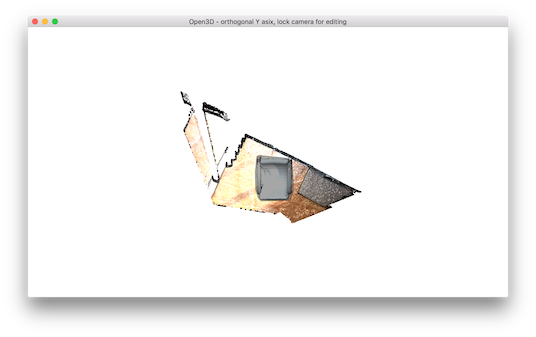
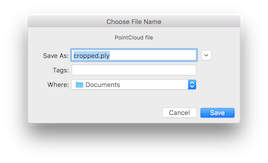
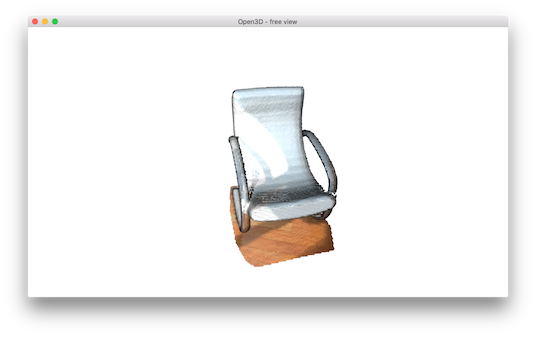
選択した領域は暗い影になっている。 選択した領域を保持し、残りの部分を破棄するには、Cを押す。するとトリミングされたジオメトリを保存するダイアログボックスが表示される。 そして保存後にクロッピング結果が表示される。

選択モードから抜けるにはFを押す。すると自由閲覧モードになる。
examples/Python/Advanced/interactive_visualization.pyの4番目の関数の一部:
# (4) Manual registration(1)
# Select correspondences
def demo_manual_registration():
    print("Demo for manual ICP")
    source = o3d.io.read_point_cloud("../../TestData/ICP/cloud_bin_0.pcd")
    target = o3d.io.read_point_cloud("../../TestData/ICP/cloud_bin_2.pcd")
    print("Visualization of two point clouds before manual alignment")
    draw_registration_result(source, target, np.identity(4))

    # pick points from two point clouds and builds correspondences
    picked_id_source = pick_points(source)
    picked_id_target = pick_points(target)
このスクリプトは2つのポイントクラウドを読み取り、アラインメント前にポイントクラウドを可視化する。

examples/Python/Advanced/interactive_visualization.pyの3番目の関数:
# (3) Manual registration (2)
def pick_points(pcd):
    print("")
    print(
        "1) Please pick at least three correspondences using [shift + left click]"
    )
    print("   Press [shift + right click] to undo point picking")
    print("2) Afther picking points, press q for close the window")
    vis = o3d.visualization.VisualizerWithEditing()
    vis.create_window()
    vis.add_geometry(pcd)
    vis.run()  # user picks points
    vis.destroy_window()
    print("")
    return vis.get_picked_points()
関数pick_points(pcd)は、VisualizerWithEditingのインスタンスを作成する。 draw_geometriesを模倣するために、ウィンドウを作成し、ジオメトリを追加し、ジオメトリを可視化し、終了する。 VisualizerWithEditinの新しいインタフェース関数は、ユーザが選択した頂点のインデックスを返すget_picked_points()である。
頂点を選択するには、ウィンドゥ上でShift + left クリックする。 頂点が選択されている場合、ビジュアライザーウィンドウは選択された頂点上の球をオーバーレイする。 たとえば、ソースのポイントクラウドで3つの頂点を選択したときは、次のように表示される。

qを押してウィンドウを閉じる。 次のステップは、ターゲットのポイントクラウドで同じ対応関係を選択することである。 球の色は同じ対応を識別するのに役立つ。

注意 (注意終わりまで)
実際にやってみた。オリジナルでは
Picked point #58481 (2.14, 1.56, 1.53) to add in queue.
Picked point #77321 (2.86, 1.92, 1.09) to add in queue.
Picked point #42639 (3.28, 1.53, 1.45) to add in queue.
と表示されると書いてあるが...
pcd = o3d.io.read_point_cloud("../../TestData/ICP/cloud_bin_0.pcd")
pick_points(pcd)
そうならなかった。少なくとも以下のようなコードが必要:
for p in pick_points(pcd):
    print("Picked point #%d %s to add in queue."%(p,str(pcd.points[p])))
注意終わり
Top 良い位置合わせ結果を得るには、シーン全体に分布するよう3つ以上のポイントを選ぶこと。特にコーナー領域に頂点を使用すると、適切な対応を簡単に選択することができる。
Registration using user correspondences
ユーザー指示の対応点を用いた位置合わせ
examples/Python/Advanced/interactive_visualization.pyの4番目の関数demo_manual_registration()の最後の部分:
    #
    # Registration using user correspondences
    #
    # assert (len(picked_id_source) >= 3 and len(picked_id_target) >= 3)
    # assert (len(picked_id_source) == len(picked_id_target))
    corr = np.zeros((len(picked_id_source), 2))
    corr[:, 0] = picked_id_source
    corr[:, 1] = picked_id_target

    # estimate rough transformation using correspondences
    print("Compute a rough transform using the correspondences given by user")
    p2p = o3d.registration.TransformationEstimationPointToPoint()
    trans_init = p2p.compute_transformation(source, target,
                                            o3d.utility.Vector2iVector(corr))

    # point-to-point ICP for refinement
    print("Perform point-to-point ICP refinement")
    threshold = 0.03  # 3cm distance threshold
    reg_p2p = o3d.registration.registration_icp(
        source, target, threshold, trans_init,
        o3d.registration.TransformationEstimationPointToPoint())
    draw_registration_result(source, target, reg_p2p.transformation)
    print("")
デモの後半では、ユーザー提供の対応関係に基づいて初期変換を計算する。 このスクリプトは、Vector2iVector(corr)を使用して一対の対応を作成する。 これは、TransformationEstimationPointToPoint.compute_transformationを使用して、対応から初期変換を計算する。 最初の変換はregistration_icpを使用して精緻化される。
位置合わせ結果は次のとおり:
