PCL/OpenNI tutorial 2: Cloud processing (basic)

前回のチュートリアルで、OpenNIとPCLをインストールした。そしてデバイスを動作させることができた。サンプルプログラムをコンパイルして実行した後、1つのフレームをフェッチして見て、さらに2つのポイントクラウドをディスクに保存した。そこで、「今度は何をやるのだろうか?深度センサーで何ができるのだろうか?ポイントクラウドで何ができるのだろう?」と疑問に思っていることだろう。
深度カメラには、便利なアプリケーションがたくさんある。たとえば、モーショントラッキングハードウェアとして使用して、数千万ドルを節約できる。オリジナルのKinectは、実際にゲームの物理コントローラ(例えば、ゲームパッド)の代替として設計された。ハンドジェスチャーも認識できるため、映画マイノリティ・レポートに見られるようなコントロール・インターフェイスを正常に実装することもできる。
ポイントクラウドで低レベルで作業すると、興味深い可能性も提供される。ポイントクラウドは基本的に3Dの「スキャン」やシーンであるため、全体の部屋を連続した3Dメッシュとしてキャプチャし、選択したモデリングソフトウェアにインポートして、再構築の基盤にできる。ロボット・ナビゲーションシステムでは、距離の測定や障害物の検出に使用できる。しかし、これまでの最もエキサイティングな研究として焦点が当てられているのは、リアルタイムにおける、3Dオブジェクトの認識と姿勢推定である。これにより、ロボットにキッチンに行かせコーヒーをとってこさせるようなことができる。
ポイントクラウドで行うことができる高度なもののほとんどは、フィルタリング、再構成や法線の推定のような事前準備を必要とする。このチュートリアルでは、ポイントクラウド処理の基礎を紹介し、複雑なメソッドは次のチュートリアルに残しておく。一つ一つのテクニックが何をするのか、それをどのように使うべきかを説明し、PCLコードスニペットにより、プログラムの形でそのテクニックを実装する方法を確認できる。
ポイントクラウド
まず、少し説明する。深度センサから得られた点群(ポイントクラウド)は、3D空間内の一連の点から構成されている。 「pcl :: PointCloud
クラウドは通常、ポインタで処理され、ポインタは大きくなりがちである。 PCLは、特定のオブジェクトへの参照を追跡するBoost C ++ライブラリから "boost :: shared_ptr"クラスを実装している。共有ポインタを渡してそのコピーが作成されるたびに、参照カウンタが自動的に増加する。ポインタが破棄されると、ポインタは減少する。カウンタが0に達すると、誰もオブジェクトへのアクティブな参照を保持していないことを意味し、そのデストラクタはメモリを解放するために呼び出される。これに慣れるのには時間がかかり、クラウドオブジェクトとクラウドオブジェクトポインタを混在しがちになるだろうが、心配しないように。
 .PCD v.7 − Point Cloud Data file format
VERSION .7
FIELDS x y z
SIZE 4 4 4
TYPE F F F
WIDTH 2
HEIGHT 1
VIEWPOINT 0 0 0 1 0 0 0
POINTS 2
DATA ascii
0.73412 -1.12643 0.82218
0.44739 -0.34735 -0.04624
これは、クラウドがタイプ「PointXYZ」のポイント2個で構成されていることを示している(各ポイントには3つのフィールドしかなく、それぞれX、Y、Z座標が4バイトの浮動小数点数で格納されているため)。 また、それらの座標もリストされている。さらにビューポート情報(センサに対する点の相対位置)が変換四元数として格納されている。 カメラの位置を知るには、法線推定のような処理に役立つ。
ファイルからの読み込み
ポイントクラウドをPCDファイルから読み込み、それをメモリに格納することは、一個の関数呼び出しで行うことができる。それには正しいポイントタイプを指定する必要がある。 たとえば、前のチュートリアルで見たOpenNIビューアアプリケーションで保存された.pcdファイルに対しては、色情報を使用しない場合 "PointXYZRGBA"や "PointXYZ"を用いる。
#include <pcl/io/pcd_io.h>

int
main(int argc, char** argv)
{
	// Object for storing the point cloud. ポイントクラウドの格納用オブジェクト
	pcl::PointCloud<pcl::PointXYZ>::Ptr cloud(new pcl::PointCloud<pcl::PointXYZ>);

	// Read a PCD file from disk.  ハードディスクからPCDファイルを読み込む
	if (pcl::io::loadPCDFile<pcl::PointXYZ>(argv[1], *cloud) != 0)
	{
		return -1;
	}
}
ここでは適切なエラー/引数チェックには気を使わなかったが、あなたはプログラムでそれを行うべきである。 そのクラスやメソッドのいずれかを紹介するたびに、必ずPCL APIをチェックするようにしよう。
- Tutorial: Reading Point Cloud data from PCD files
- API: pcl::io namespace
- Download
ファイルへの書き込み
ポイントクラウドをファイルに保存することは、それを読むことと同じくらい簡単である。 普通の可読なテキスト形式(ASCII)とバイナリ形式のどちらか選択できる。 テキスト形式のファイルはテキストエディタで読み取ったり変更したりすることができ、バイナリ形式は高速に処理できる。
#include <pcl/io/pcd_io.h>

int
main(int argc, char** argv)
{
	// Object for storing the point cloud. ポイントクラウドの格納用オブジェクト
	pcl::PointCloud<pcl::PointXYZ>::Ptr cloud(new pcl::PointCloud<pcl::PointXYZ>);

	// Read a PCD file from disk. ハードディスクからPCDファイルを読み込む
	if (pcl::io::loadPCDFile<pcl::PointXYZ>(argv[1], *cloud) != 0)
	{
		return -1;
	}

	// Write it back to disk under a different name. 別な名前でハードディスクに書き込む
	// Another possibility would be "savePCDFileBinary()".  savePCDFileBinary()関数も使える
	pcl::io::savePCDFileASCII("output.pcd", *cloud);
}
- Tutorial: Writing Point Cloud data to PCD files
- API: pcl::io namespace
- Download
視覚化
もちろん、PCLにはポイントクラウドなどを読み込んで可視化するための専用プログラムが付属している(pcl_viewer)。 次のように端末からこれを実行することができる:
pcl_viewer <file 1> [file 2] ... [file N]
複数のファイルを読み込むと、それぞれのクラウドは異なる色でレンダリングされ、区別するのに役立つ。 プログラムは内部的にpcl :: visualization :: PCLVisualizerクラスを使用する。 実行中にHキーを押すと、端末でヘルプが印刷される。 私が有用であると思うキーは1である。これによりクラウドに別の色を選択できる(現在の色では見るのが難しい場合に便利)。Rはカメラをリセットし、JはPNGスナップショットを保存する。
コードによって、クラウドを繰り返し処理し、各ポイントの情報をコンソールに出力することは可能ではあるが、面倒である。 場合によっては、クラウドを視覚化して何かをチェックしたいこともある。 PCLはあなたのためにウィンドウを作成して表示することができ、ユーザーはパンやズームを行うことができる。 最も簡単な方法は次のとおり。
#include <pcl/io/pcd_io.h>
#include <pcl/visualization/cloud_viewer.h>

int
main(int argc, char** argv)
{
	// Object for storing the point cloud.  ポイントクラウドの格納用オブジェクト
	pcl::PointCloud<pcl::PointXYZ>::Ptr cloud(new pcl::PointCloud<pcl::PointXYZ>);

	// Read a PCD file from disk.   ハードディスクからPCDファイルを読み込む
	if (pcl::io::loadPCDFile<pcl::PointXYZ>(argv[1], *cloud) != 0)
	{
		return -1;
	}

	// Cloud viewer object. You can set the window title.
    // クラウド映像化オブジェクト。ウィンドゥの題名も設定可能
	pcl::visualization::CloudViewer viewer(argv[1]);
	viewer.showCloud(cloud);
	while (!viewer.wasStopped())
	{
		// Do nothing but wait.  ただ待つだけ
	}
}
CloudViewer」の機能は「PCLVisualizer」よりも少ないが、設定が簡単である。 このプログラムは、Alt + F4やQを押してでウィンドウを閉じるまでアクティブである。
2つのクラウドを連結する
ポイントクラウドとの連結には2つのタイプがある。
- ポイント:最初に2つのクラウド「A」と「B」があり、それぞれ「N」個と「M」個のポイントがあるとする。 第3のクラウドを作り(「C」)、これに「N + M」個の点(最初の2つのクラウドの点すべて)を含める。 これを行うには、すべてのクラウドのポイントタイプが同じ( "PointXYZ"や "Normal"など)である必要がある。
- フィールド:これにより、異なるタイプの2つのクラウドのフィールドを結合できる。 唯一の制約は、両方とも同じ個数のポイント(点)を持たなければならないことである。 たとえば、それぞれ、N個のポイントを持つ「PointXYZ」タイプのクラウドと「Normal」タイプのクラウドを連結して、タイプ「PointNormal」(X、Y、Z座標と法線を格納するタイプ)のクラウドを作成できる。ここで新しいクラウドも "N"個の点がある。
オーバーロードされるクラウドの加算演算子(+)が使えるため、ポイント連結は最も簡単である。
#include <pcl/io/pcd_io.h>

int
main(int argc, char** argv)
{
	// Objects for storing the point clouds.  ポイントクラウドの格納用オブジェクト
	pcl::PointCloud<pcl::PointXYZRGBA>::Ptr cloudA(new pcl::PointCloud<pcl::PointXYZRGBA>);
	pcl::PointCloud<pcl::PointXYZRGBA>::Ptr cloudB(new pcl::PointCloud<pcl::PointXYZRGBA>);
	pcl::PointCloud<pcl::PointXYZRGBA>::Ptr cloudC(new pcl::PointCloud<pcl::PointXYZRGBA>);

	// Read two PCD files from disk.  ハードディスクからPCDファイルを読み込む
	if (pcl::io::loadPCDFile<pcl::PointXYZRGBA>(argv[1], *cloudA) != 0)
	{
		return -1;
	}
	if (pcl::io::loadPCDFile<pcl::PointXYZRGBA>(argv[2], *cloudB) != 0)
	{
		return -1;
	}

	// Create cloud "C", with the points of both "A" and "B".
    // クラウド"A" と "B" 両方のポイントを持つクラウド"C"を作成
	*cloudC = (*cloudA) + (*cloudB);
	// Now cloudC->points.size() equals cloudA->points.size() + cloudB->points.size().
    // これによりcloudC->points.size() は cloudA->points.size() + cloudB->points.size() に等しい
}
フィールド連結は関数呼び出し一個でできる:
#include <pcl/io/pcd_io.h>
#include <pcl/features/normal_3d.h>

#include <iostream>

int
main(int argc, char** argv)
{
	// Objects for storing the point clouds. ポイントクラウドの格納用オブジェクト
	pcl::PointCloud<pcl::PointXYZ>::Ptr cloudPoints(new pcl::PointCloud<pcl::PointXYZ>);
	pcl::PointCloud<pcl::Normal>::Ptr cloudNormals(new pcl::PointCloud<pcl::Normal>);
	pcl::PointCloud<pcl::PointNormal>::Ptr cloudAll(new pcl::PointCloud<pcl::PointNormal>);

	// Read a PCD file from disk.  ハードディスクからPCDファイルを読み込む
	if (pcl::io::loadPCDFile<pcl::PointXYZ>(argv[1], *cloudPoints) != 0)
	{
		return -1;
	}

	// Compute the normals of the cloud (do not worry, we will see this later).
    // クラウドの法線を計算(心配しなくてもこれについては後で検討する)
	pcl::NormalEstimation<pcl::PointXYZ, pcl::Normal> normalEstimation;
	normalEstimation.setInputCloud(cloudPoints);
	normalEstimation.setRadiusSearch(0.05);
	pcl::search::KdTree<pcl::PointXYZ>::Ptr kdtree(new pcl::search::KdTree<pcl::PointXYZ>);
	normalEstimation.setSearchMethod(kdtree);
	normalEstimation.compute(*cloudNormals);

	// Concatenate the fields (PointXYZ + Normal = PointNormal).
    // フィールドを結合 (PointXYZ + Normal = PointNormal)
	pcl::concatenateFields(*cloudPoints, *cloudNormals, *cloudAll);

	// Print the data to standard output. 標準出力にデータを表示
	for (size_t currentPoint = 0; currentPoint < cloudAll->points.size(); currentPoint++)
	{
		std::cout << "Point:" << std::endl;
		std::cout << "\tXYZ:" << cloudAll->points[currentPoint].x << " "
				  << cloudAll->points[currentPoint].y << " "
				  << cloudAll->points[currentPoint].z << std::endl;
		std::cout << "\tNormal:" << cloudAll->points[currentPoint].normal[0] << " "
				  << cloudAll->points[currentPoint].normal[1] << " "
				  << cloudAll->points[currentPoint].normal[2] << std::endl;
	}
}
行列変換
クラウドは、変換(変換、回転、スケーリング)で直接操作できる。3D変換では4x4の行列を使用するが、これは少し複雑である(特にローテーションの場合)。そのため、使用する前に本やチュートリアルを確認しておこう。 変換されたクラウドは別のオブジェクトに保存されるので、両方のバージョンを保持したいときに使用できる。
#include <pcl/io/pcd_io.h>
#include <pcl/common/transforms.h>
#include <pcl/visualization/pcl_visualizer.h>

int
main(int argc, char** argv)
{
	// Objects for storing the point clouds.  ポイントクラウドの格納用オブジェクト
	pcl::PointCloud<pcl::PointXYZ>::Ptr cloud(new pcl::PointCloud<pcl::PointXYZ>);
	pcl::PointCloud<pcl::PointXYZ>::Ptr transformed(new pcl::PointCloud<pcl::PointXYZ>);

	// Read a PCD file from disk.  ハードディスクからPCDファイルを読み込む
	if (pcl::io::loadPCDFile<pcl::PointXYZ>(argv[1], *cloud) != 0)
	{
		return -1;
	}

	// Transformation matrix object, initialized to the identity matrix
	// (a null transformation).
    // 変換強烈オブジェクト、単位行列に初期化(恒等変換)
	Eigen::Matrix4f transformation = Eigen::Matrix4f::Identity();

	// Set a rotation around the Z axis (right hand rule).
    // Z軸周りに回転(右手系)
	float theta = 90.0f * (M_PI / 180.0f); // 90 degrees. 90度をラディアンで
	transformation(0, 0) = cos(theta);
	transformation(0, 1) = -sin(theta);
	transformation(1, 0) = sin(theta);
	transformation(1, 1) = cos(theta);

	// Set a translation on the X axis. X軸で回転
	transformation(0, 3) = 1.0f; // 1 meter (positive direction). 1m(正方向)

	pcl::transformPointCloud(*cloud, *transformed, transformation);

	// Visualize both the original and the result. 元のクラウドと結果のクラウドの両方を視覚化
	pcl::visualization::PCLVisualizer viewer(argv[1]);
	viewer.addPointCloud(cloud, "original");
	// The transformed one's points will be red in color. 変換した方のポイントを赤で表示
	pcl::visualization::PointCloudColorHandlerCustom<pcl::PointXYZ> colorHandler(transformed, 255, 0, 0);
	viewer.addPointCloud(transformed, colorHandler, "transformed");
	// Add 3D colored axes to help see the transformation. 変換を見やすくするため3D色軸を追加
	viewer.addCoordinateSystem(1.0, 0);

	while (!viewer.wasStopped())
	{
		viewer.spinOnce();
	}
}
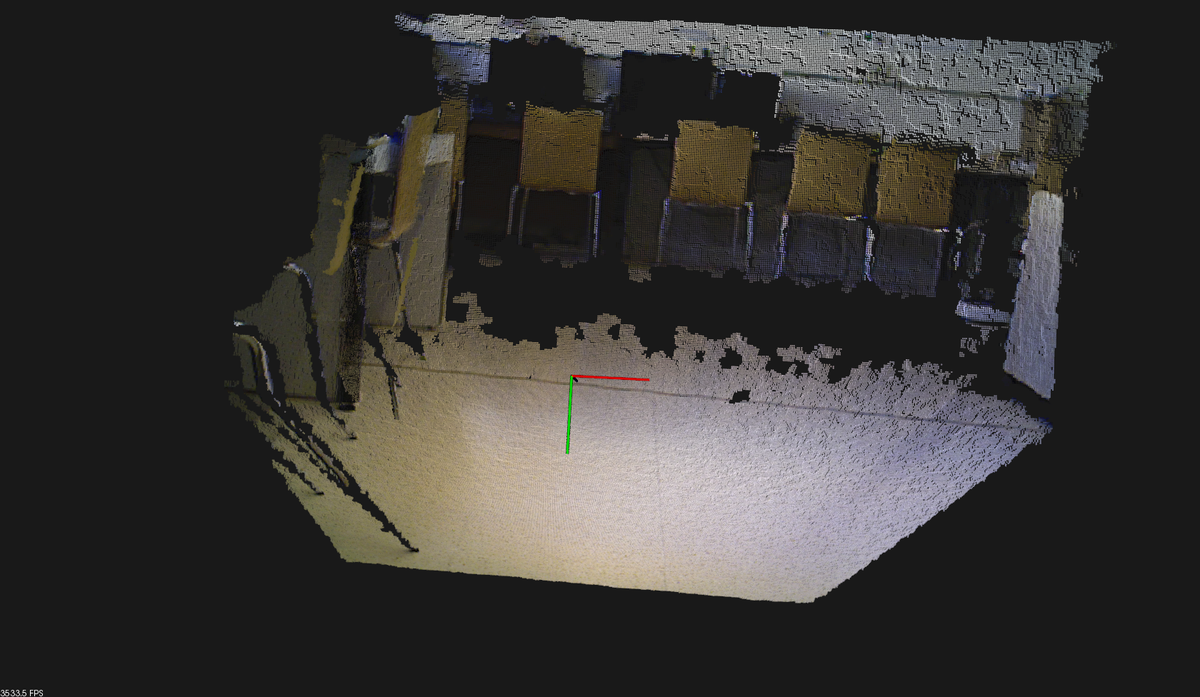
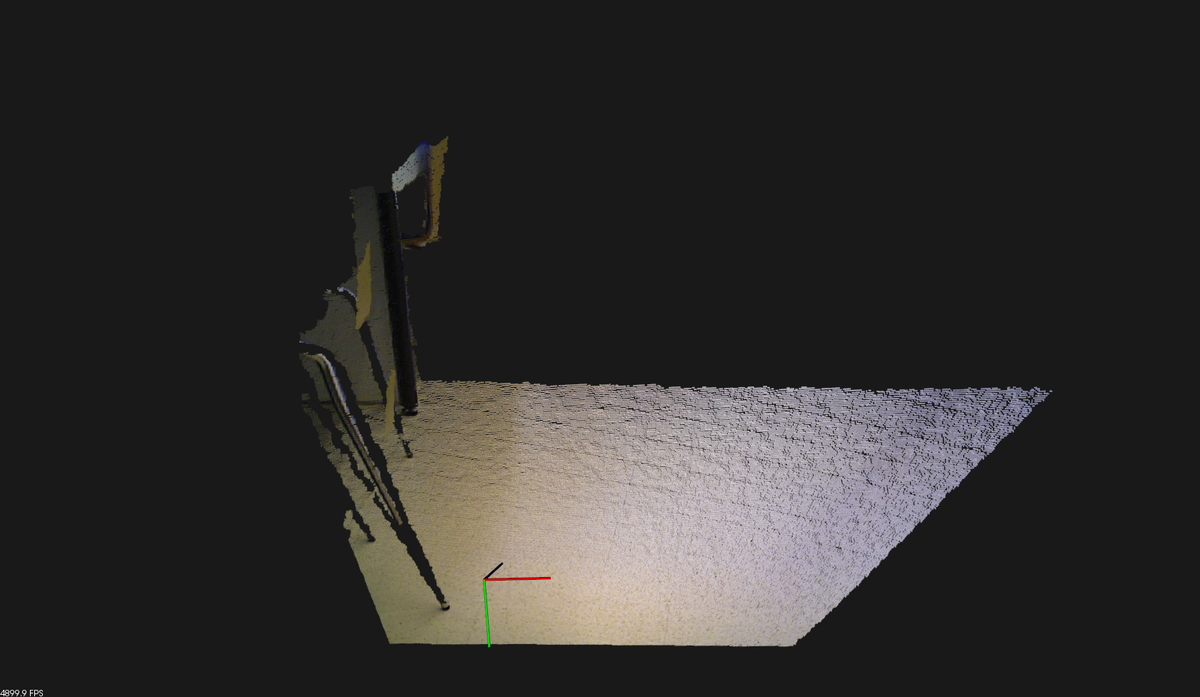
 クラウドに回転と移動を適用した例
"Eigen::Matrix4"オブジェクトの代わりに "Eigen::Affine3"や "Eigen::Quaternion"を使うこともできるので、残りの関数をチェックしてみよう。
別の重要な注意:上記のパラメータを持つ関数 "addCoordinateSystem()"は、新しいバージョンのPCLでは廃止予定とされている。 これからは、次のようなものを使用する必要がある:
viewer.addCoordinateSystem(1.0, "reference", 0);
- 入力: ポイントクラウド, 変換行列
- 出力: 変換されたポイントクラウド
- Tutorial: Using a matrix to transform a point cloud
- API: pcl::transformPointCloud()
- Download
インデックスの使用
PCLのアルゴリズムの多くはインデックスを返す。 インデックスは、クラウドのポイントのリストである(すべてのデータを含むポイント自体ではなく、クラウド内のインデックスのみ)。 例えば、シリンダ分割アルゴリズムは、シリンダモデルに合うと考えられた点のリストを出力として提供する。 次にインデックスを使用して、 "pcl :: ExtractIndices"クラスでの作業のためにポイントを2番目のクラウドに抽出できる。 その "setNegative()"関数は、索引付けされていないポイントを抽出するよう指示する(クラウドからすべての円柱状のクラスターを削除できる)。
#include <pcl/io/pcd_io.h>
#include <pcl/filters/extract_indices.h>
#include <pcl/segmentation/sac_segmentation.h>

#include <vector>

int
main(int argc, char** argv)
{
	// Objects for storing the point clouds.  ポイントクラウドの格納用オブジェクト
	pcl::PointCloud<pcl::PointXYZ>::Ptr cloudAll(new pcl::PointCloud<pcl::PointXYZ>);
	pcl::PointCloud<pcl::PointXYZ>::Ptr cloudExtracted(new pcl::PointCloud<pcl::PointXYZ>);

	// Read a PCD file from disk.  ハードディスクからPCDファイルを読み込む
	if (pcl::io::loadPCDFile<pcl::PointXYZ>(argv[1], *cloudAll) != 0)
	{
		return -1;
	}

	// Plane segmentation (do not worry, we will see this later).
    // 平面分割(心配しなくても、後で検討)
	pcl::ModelCoefficients::Ptr coefficients(new pcl::ModelCoefficients);
	pcl::SACSegmentation<pcl::PointXYZ> segmentation;
	segmentation.setOptimizeCoefficients(true);
	segmentation.setModelType(pcl::SACMODEL_PLANE);
	segmentation.setMethodType(pcl::SAC_RANSAC);
	segmentation.setDistanceThreshold(0.01);
	segmentation.setInputCloud(cloudAll);

	// Object for storing the indices. インデックスの格納用のオブジェクト
	pcl::PointIndices::Ptr pointIndices(new pcl::PointIndices);

	segmentation.segment(*pointIndices, *coefficients);

	// Object for extracting points from a list of indices.
    // インデックスのリストからポイントを抽出するためのオブジェクト
	pcl::ExtractIndices<pcl::PointXYZ> extract;
	extract.setInputCloud(cloudAll);
	extract.setIndices(pointIndices);
	// We will extract the points that are NOT indexed (the ones that are not in a plane).
    // インデックス付けられていないポイント(平面にないポイント)を抽出
	extract.setNegative(true);
	extract.filter(*cloudExtracted);
}
- 入力: ポイント、インデックス、(Negative mode)
- 出力: ポイント
- Tutorial: Extracting indices from a PointCloud
- API:
- Download
NaNの削除
センサから取り出されたクラウドは、いくつかの種類の測定誤差および/または不正確さを含むことがある。 そのうちの1つは、次のファイルに示すように、いくつかの点の座標にNaN(Not a Number)値が存在することである。
# .PCD v0.7 - Point Cloud Data file format
VERSION 0.7
FIELDS x y z rgba
SIZE 4 4 4 4
TYPE F F F U
COUNT 1 1 1 1
WIDTH 640
HEIGHT 480
VIEWPOINT 0 0 0 1 0 0 0
POINTS 307200
DATA ascii
nan nan nan 10135463
nan nan nan 10398635
nan nan nan 10070692
nan nan nan 10268071
...
Cloudオブジェクトには、すべてのポイントに有効な有限値がある場合にtrueを返すis_dense()というメンバー関数がある。 NaNは、その点までの距離を測定する際に問題があったことを示す。おそらく、センサが近すぎたり、遠すぎたりしているか、表面が反射していたためである。
悲しいことに、PCLのアルゴリズムの多くはクラウド内にNaNが1つでも存在する入力に対しては失敗する:"Assertionpointrepresentation->isValid (point) && "Invalid (NaN, Inf) point coordinates given to radiusSearch!" failed.`というようなメッセージが出る。このような場合は、NaN値をクラウドから削除する必要がある。 次のようなプログラムを使用して、すべてのNaNポイントからクラウドを「クリーン」にすることができる。
#include <pcl/io/pcd_io.h>
#include <pcl/filters/filter.h>

#include <iostream>

int
main(int argc, char** argv)
{
	if (argc != 3)
	{
		std::cout << "\tUsage: " << argv[0] << " <input cloud> <output cloud>" << std::endl;

		return -1;
	}

	// Object for storing the point cloud.  ポイントクラウドの格納用オブジェクト
	pcl::PointCloud<pcl::PointXYZ>::Ptr cloud(new pcl::PointCloud<pcl::PointXYZ>);

	// Read a PCD file from disk.  ハードディスクからPCDファイルを読み込む
	if (pcl::io::loadPCDFile<pcl::PointXYZ>(argv[1], *cloud) != 0)
	{
		return -1;
	}

	// The mapping tells you to what points of the old cloud the new ones correspond,
	// but we will not use it.
    // このmappingにより元のクラウドのどのポイントが新しいクラウドのどこに写像されたかわかるが、
    // これは使わない
	std::vector<int> mapping;
	pcl::removeNaNFromPointCloud(*cloud, *cloud, mapping);

	// Save it back. PCDファイルに書き出す
	pcl::io::savePCDFileASCII(argv[2], *cloud);
}
この方法の問題は、クラウドを組織化しないということである。 すべてのクラウドは「幅」と「高さ」変数を格納している。 組織化されていないクラウドでは、ポイントの総数は幅と同じで、高さは1に設定されている。(KinectやXtionなどのカメラのようなセンサーから取得したものと同様に)組織化されたクラウドでは、幅と高さは センサと同じ画像解像度のピクセルと同じである。 ポイントは、奥行き画像のように「行」に分布し、それらのすべてがピクセルに対応する。 高さが1より大きい場合、メンバー関数 "isOrganized()"はtrueを返す。
NaNを削除するとクラウドのポイント数が変更されるため、元の幅/高さの比率で整理しておくことができなくなる。そこで、関数は高さを1に設定する。これは大きな問題ではない。 PCLのアルゴリズムは組織化されたクラウドで明示的に動作する(主に最適化のために使用する)が、考慮する必要がある。
- 入力: クラウド
- 出力: NaNのないクラウド
- API: pcl::removeNaNFromPointCloud()
- Download
PNGの保存
PCLはポイントクラウドの値をPNG画像ファイルに保存することができる。 明らかに、これは組織化されたクラウドでのみ行うことができる。結果の画像の行と列がクラウドのものと正確に対応するためである。 たとえば、KinectやXtionなどのセンサーから取得したポイントクラウドを用いる場合、これによりクラウドと一致する640x480のRGBイメージを取得できる。
#include <pcl/io/pcd_io.h>
#include <pcl/io/png_io.h>

int
main(int argc, char** argv)
{
	// Object for storing the point cloud. ポイントクラウドの格納用オブジェクト
	pcl::PointCloud<pcl::PointXYZRGB>::Ptr cloud(new pcl::PointCloud<pcl::PointXYZRGB>);

	// Read a PCD file from disk.  ハードディスクからPCDファイルを読み込む
	if (pcl::io::loadPCDFile<pcl::PointXYZRGB>(argv[1], *cloud) != 0)
	{
		return -1;
	}

	// Save the image (cloud must be organized). png画像として保存(クラウドは組織化されているはず)
	pcl::io::savePNGFile("output.png", *cloud, "rgb");
}
関数 "savePNGFile()"にはいくつかの実装がある。 この場合、保存するフィールドを指定できるようになった。 このパラメータを省略すると、デフォルトでRGBフィールドが保存される。
#include <pcl/io/pcd_io.h>
#include <pcl/common/centroid.h>

#include <iostream>

int
main(int argc, char** argv)
{
	// Object for storing the point cloud.  ポイントクラウドの格納用オブジェクト
	pcl::PointCloud<pcl::PointXYZ>::Ptr cloud(new pcl::PointCloud<pcl::PointXYZ>);

	// Read a PCD file from disk.  ハードディスクからPCDファイルを読み込む
	if (pcl::io::loadPCDFile<pcl::PointXYZ>(argv[1], *cloud) != 0)
	{
		return -1;
	}

	// Object to store the centroid coordinates. 重心の座標を記憶するためのオブジェクト
	Eigen::Vector4f centroid;

	pcl::compute3DCentroid(*cloud, centroid);

	std::cout << "The XYZ coordinates of the centroid are: ("
			  << centroid[0] << ", "
			  << centroid[1] << ", "
			  << centroid[2] << ")." << std::endl;
}
法線の推定
幾何学で学んだように、平面の法線とは平面に垂直な単位ベクトルのことである。ある点でのサ表面形状の法線は、その点で表面形状に接する平面に対し垂直なベクトルとして定義される。表面法線は、クラウドの点についても計算できる。非常に弁別的なものではないが、特徴量とみなされる。
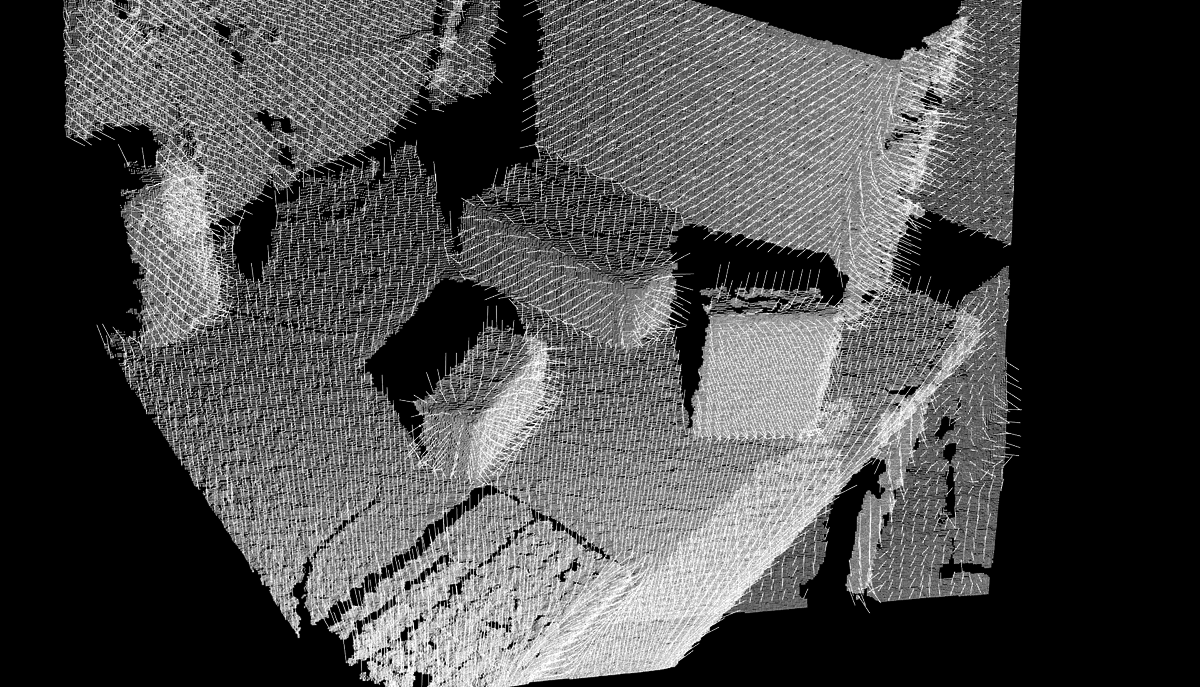
推定方法の数学について詳しくは述べないが、接平面と法線ベクトルを見つけるのに最近傍の点集合(法線計算の対象となっている点に最も近い点の集まり)を使用することを知っておかなければならない。探索半径と視点によりこの計算を調整することができる。ここで探索半径とは、対象点を中心とする球の半径であり、その球の中にあるすべての隣接点が計算に使用される。またデフォルトでは出力の法線は向きを持たないため、すべての法線ベクトルはカメラの方向に向いてなければならないと仮定し、向きをもたせている。そうでなければ、センサーからは見えない表面形状に属すことになってしまうからである。
法線はまた、ある点における表面の曲率に関する情報を提供するため、重要である。曲率はとても役に立つものである。 PCLのアルゴリズムの多くは、入力クラウドの法線を提供する必要がある。その推定には、次のコードを使用する:
#include <pcl/io/pcd_io.h>
#include <pcl/features/normal_3d.h>
#include <boost/thread/thread.hpp>
#include <pcl/visualization/pcl_visualizer.h>

int
main(int argc, char** argv)
{
	// Object for storing the point cloud.  ポイントクラウドの格納用オブジェクト
	pcl::PointCloud<pcl::PointXYZ>::Ptr cloud(new pcl::PointCloud<pcl::PointXYZ>);
	// Object for storing the normals.
	pcl::PointCloud<pcl::Normal>::Ptr normals(new pcl::PointCloud<pcl::Normal>);

	// Read a PCD file from disk.  ハードディスクからPCDファイルを読み込む
	if (pcl::io::loadPCDFile<pcl::PointXYZ>(argv[1], *cloud) != 0)
	{
		return -1;
	}

	// Object for normal estimation. 法線推定のオブジェクト
	pcl::NormalEstimation<pcl::PointXYZ, pcl::Normal> normalEstimation;
	normalEstimation.setInputCloud(cloud);
	// For every point, use all neighbors in a radius of 3cm. どのポイントも半径3cmの近接点全て使う
	normalEstimation.setRadiusSearch(0.03);
	// A kd-tree is a data structure that makes searches efficient. More about it later.
    // kd木は効率的な探索を可能にするデータ構造。詳しくは後述。
    // The normal estimation object will use it to find nearest neighbors.
    // 法線推定オブジェクトはこれを用いて最近傍点を見つける
	pcl::search::KdTree<pcl::PointXYZ>::Ptr kdtree(new pcl::search::KdTree<pcl::PointXYZ>);
	normalEstimation.setSearchMethod(kdtree);

	// Calculate the normals. 法線を計算
	normalEstimation.compute(*normals);

	// Visualize them. これを視覚化
	boost::shared_ptr<pcl::visualization::PCLVisualizer> viewer(new pcl::visualization::PCLVisualizer("Normals"));
	viewer->addPointCloud<pcl::PointXYZ>(cloud, "cloud");
	// Display one normal out of 20, as a line of length 3cm.
    // 20個中1個の割合で法線を表示、3cmの長さとする
	viewer->addPointCloudNormals<pcl::PointXYZ, pcl::Normal>(cloud, normals, 20, 0.03, "normals");
	while (!viewer->wasStopped())
	{
		viewer->spinOnce(100);
		boost::this_thread::sleep(boost::posix_time::microseconds(100000));
	}
}
見てわかるように、法線は "PointCloud"オブジェクトにも保存され、 "Normal"タイプにインスタンス化される。クラウドからインデックスを抽出してアルゴリズムに渡す場合には、その前に法線に対しても同じことをする。 ここではまだ "setViewPoint()"関数を使っていないが、あなたはそれが何をするものかはわかっているだろう。
"setRadiusSearch()"の代わりに、整数$K$を取る "setKSearch()"を使うことができる。これは、探索半径の代わりに点の$K$最近傍を用いて法線計算するものである。 ポイントが密集した場所にないポイントでは、「隣接点」があまりにも遠い位置にあるため、奇妙な結果を生み出すことがあるということに注意しよう。
 ポイントクラウドに対する法線計算の視覚化
- 入力: ポイント、探索方法、探索半径または近傍点の個数、 (インデックス), (視点)
- Tutorial: Estimating Surface Normals in a Point Cloud
- Download
積分画像
積分画像とは、組織化されたクラウドに対する法線推定の方法である。 このアルゴリズムでは、クラウドを奥行き画像として認識し、木など検索構造を探索せずに、隣接する「ピクセル」(ポイント)の関係を考慮することにより、法線が計算される矩形領域を作成する 。 このため、非常に効率的であり、法線は瞬間的に計算される。 RGB-Dセンサーから得られるクラウドをリアルタイムで計算する場合は、他の方法では数秒かかるであろうから、これを用いるべきである。
#include <pcl/io/pcd_io.h>
#include <pcl/features/integral_image_normal.h>
#include <boost/thread/thread.hpp>
#include <pcl/visualization/pcl_visualizer.h>

int
main(int argc, char** argv)
{
	// Object for storing the point cloud.  ポイントクラウドの格納用オブジェクト
	pcl::PointCloud<pcl::PointXYZ>::Ptr cloud(new pcl::PointCloud<pcl::PointXYZ>);
	// Object for storing the normals.
	pcl::PointCloud<pcl::Normal>::Ptr normals(new pcl::PointCloud<pcl::Normal>);

	// Read a PCD file from disk.  ハードディスクからPCDファイルを読み込む
	if (pcl::io::loadPCDFile<pcl::PointXYZ>(argv[1], *cloud) != 0)
	{
		return -1;
	}

	// Object for normal estimation. 法線推定のオブジェクト
	pcl::IntegralImageNormalEstimation<pcl::PointXYZ, pcl::Normal> normalEstimation;
	normalEstimation.setInputCloud(cloud);
	// Other estimation methods: COVARIANCE_MATRIX, AVERAGE_DEPTH_CHANGE, SIMPLE_3D_GRADIENT.
	// They determine the smoothness of the result, and the running time.
    // 別な推定手法: COVARIANCE_MATRIX, AVERAGE_DEPTH_CHANGE, SIMPLE_3D_GRADIENT.
    // 結果の滑らかさと、実行時間とを返す
	normalEstimation.setNormalEstimationMethod(normalEstimation.AVERAGE_3D_GRADIENT);
	// Depth threshold for computing object borders based on depth changes, in meters.
    // 深さの変化に基づきオブジェクトの境界を計算するための深さの閾値、単位はメートル
	normalEstimation.setMaxDepthChangeFactor(0.02f);
	// Factor that influences the size of the area used to smooth the normals.
    // 法線を滑らかにするのに使われる領域サイズの係数
	normalEstimation.setNormalSmoothingSize(10.0f);

	// Calculate the normals. 法線の計算
	normalEstimation.compute(*normals);

	// Visualize them. 視覚化
	boost::shared_ptr<pcl::visualization::PCLVisualizer> viewer(new pcl::visualization::PCLVisualizer("Normals"));
	viewer->addPointCloud<pcl::PointXYZ>(cloud, "cloud");
	// Display one normal out of 20, as a line of length 3cm.
    // 20個中1個の割合で法線を表示、3cmの長さとする
	viewer->addPointCloudNormals<pcl::PointXYZ, pcl::Normal>(cloud, normals, 20, 0.03, "normals");
	while (!viewer->wasStopped())
	{
		viewer->spinOnce(100);
		boost::this_thread::sleep(boost::posix_time::microseconds(100000));
	}
}
- 入力: ポイント、推定手法, (Smoothing factor), (Depth threshold), (Rectangle size]), (Border policy), (Depth dependent smoothing)
- 出力: 法線
- Tutorial: Normal Estimation Using Integral Images
- 論文
- Holzer, S. et al. (2012) Adaptive Neighborhood Selection for Real-Time Surface Normal Estimation from Organized Point Cloud Data Using Integral Images
- Holz, D. et al. (2012) Real-Time Plane Segmentation using RGB-D Cameras
- Holzer, S. et al. (2012) Adaptive Neighborhood Selection for Real-Time Surface Normal Estimation from Organized Point Cloud Data Using Integral Images
- API: pcl::IntegralImageNormalEstimation
- Download
分解
分解とは、クラウドのポイントから順番に整理されたデータ構造を作成するプロセスのことであり、その目的としてはその後の処理を容易にする、フィルターを適用するということがある。
k-d木
kd木(k次元木)とはk次元空間内の点の集合を組織化するデータ構造であり、範囲内の探索操作を非常に効率的にする方法である(例えば、ポイントの最近傍、すなわち空間内でそのポイントに近い点を見つける、また半径内のすべての近傍ポイントをすべて見つける)。
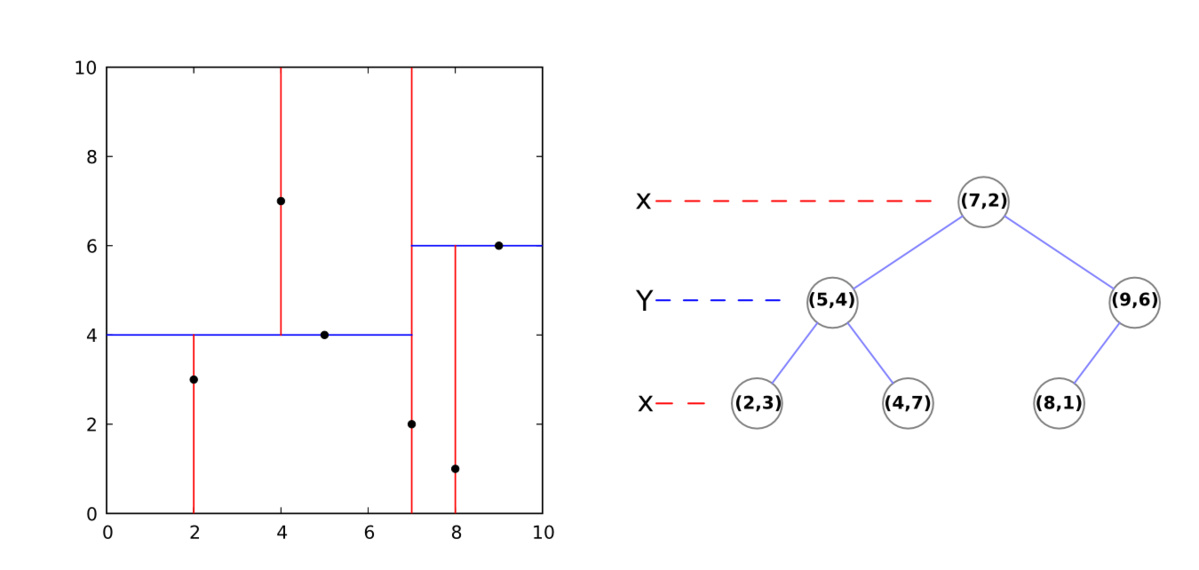
k-d木は二進木であり、どの葉でない頂点も高々2個の子頂点をもち、左の子と右の子と呼ばれる。そしてレベルにより空間をある次元で分割する。たとえば3次元空間では、根頂点(第1レベル)ではすべての子が第1次元、つまりXに基づいて分割される(X値の大きい座標のポイントは右の部分木に、小さいポイントは左の部分木になる)。2番目のレベル(ちょうど作成したばかりのノード)では、分割は同じ基準に従いY軸に対し行われる。第3レベル(孫)では、Z軸を使用する。第4レベルではまたX軸に戻る、などが繰り返される。通常、中央値がすべてのレベルで根となるように選択される。
 2Dのkd-木の例
PCLにおいては、クラウドからのk-d木の作成は簡単で早い処理が行われる。
探索
次のコードスニペットはk-d木を使って効率的な探索を実施する方法を示すものである:
#include <pcl/io/pcd_io.h>
#include <pcl/search/kdtree.h>

#include <iostream>
#include <vector>

int
main(int argc, char** argv)
{
	// Object for storing the point cloud.  ポイントクラウドの格納用オブジェクト
	pcl::PointCloud<pcl::PointXYZ>::Ptr cloud(new pcl::PointCloud<pcl::PointXYZ>);

	// Read a PCD file from disk.  ハードディスクからPCDファイルを読み込む
	if (pcl::io::loadPCDFile<pcl::PointXYZ>(argv[1], *cloud) != 0)
	{
		return -1;
	}

	// kd-tree object.   kd木オブジェクト
	pcl::search::KdTree<pcl::PointXYZ> kdtree;
	kdtree.setInputCloud(cloud);

	// We will find the 5 nearest neighbors of this point
	// (it does not have to be one of the cloud's, we can use any coordinate).
    // 次のポイントに対する最近傍点を5個見つける(これはクラウドの点である必要はない)
	pcl::PointXYZ point;
	point.x = 0.0524343;
	point.y = -0.58016;
	point.z = 1.776;
	// This vector will store the output neighbors. 出力の近傍点を記憶するためのベクトル
	std::vector<int> pointIndices(5);
	// This vector will store their squared distances to the search point.
    // このベクトルは探索ポイントへの距離の自乗を記憶する
	std::vector<float> squaredDistances(5);
	// Perform the search, and print out results. 探索を行い結果を出力する
	if (kdtree.nearestKSearch(point, 5, pointIndices, squaredDistances) > 0)
	{
		std::cout << "5 nearest neighbors of the point:" << std::endl;
		for (size_t i = 0; i < pointIndices.size(); ++i)
			std::cout << "\t" << cloud->points[pointIndices[i]].x
					  << " " << cloud->points[pointIndices[i]].y
					  << " " << cloud->points[pointIndices[i]].z
					  << " (squared distance: " << squaredDistances[i] << ")" << std::endl;
	}

	// Now we find all neighbors within 3cm of the point
	// (inside a sphere of radius 3cm centered at the point).
    // このポイントから3cm内の近傍点をすべて見つける(ポイントを中心として半径3cmの球内の点)
	if (kdtree.radiusSearch(point, 0.03, pointIndices, squaredDistances) > 0)
	{
		std::cout << "Neighbors within 3cm:" << std::endl;
		for (size_t i = 0; i < pointIndices.size(); ++i)
			std::cout << "\t" << cloud->points[pointIndices[i]].x
					  << " " << cloud->points[pointIndices[i]].y
					  << " " << cloud->points[pointIndices[i]].z
					  << " (squared distance: " << squaredDistances[i] << ")" << std::endl;
	}
}
もう1つの選択肢は「KdTreeFLANN」、つまりFLANN(Approximate Nearest NeighborsのFast Library)を利用するものである。
- 入力: ポイント、半径 | 近傍点数
- 出力: ポイントのインデックス、距離の2乗
- Tutorial: How to use a KdTree to search
- API:
- Download
八分木
k-d木と同様、八分木は、検索に有用な階層木構造であるが、圧縮やダウンサンプリングも可能である。 八分木のどの頂点(ボクセルと呼ばれ、3Dエンジンのユーザによく知られている用語であり、「3Dピクセル」すなわち立方体と表される)も、8個の子頂点があるか、もしくは子頂点がないものである。 根頂点は、すべての点をカプセル化する立方体の境界ボックスを表す。どのレベルにおいても2分割され、その結果ボクセル分解能が増す。 こうすることで、特定のゾーンに選択的に解像度を増やすことができる。
 八分木の図示
探索
ダウンサンプリングについては別のセクションで説明するので、ここでは八分木で検索を実行する方法を説明する:
#include <pcl/io/pcd_io.h>
#include <pcl/octree/octree.h>

#include <iostream>
#include <vector>

int
main(int argc, char** argv)
{
	// Object for storing the point cloud.  ポイントクラウドの格納用オブジェクト
	pcl::PointCloud<pcl::PointXYZ>::Ptr cloud(new pcl::PointCloud<pcl::PointXYZ>);

	// Read a PCD file from disk.  ハードディスクからPCDファイルを読み込む
	if (pcl::io::loadPCDFile<pcl::PointXYZ>(argv[1], *cloud) != 0)
	{
		return -1;
	}

	// Octree object, with a maximum resolution of 128
	// (resolution at lowest octree level).
    // 八分木オブジェクト、最大解像度を128とする(最深レベルでの解像度)
	pcl::octree::OctreePointCloudSearch<pcl::PointXYZ> octree(128);
	octree.setInputCloud(cloud);
	octree.addPointsFromInputCloud();

	// We will find all neighbors within the same voxel as this point.
	// (it does not have to be one of the cloud's, we can use any coordinate).
    // 次のポイントと同じボクセル内のすべての近傍点を見つける(クラウドのポイントである必要はない)
	pcl::PointXYZ point;
	point.x = 0.0524343;
	point.y = -0.58016;
	point.z = 1.776;
	// This vector will store the output neighbors. このベクトルに出力の近傍点を記憶する
	std::vector<int> pointIndices;
	// Perform the search, and print out results. 探索を行い、結果を表示する
	if (! octree.voxelSearch(point, pointIndices) > 0)
	{
		std::cout << "Neighbors in the same voxel:" << std::endl;
		for (size_t i = 0; i < pointIndices.size(); ++i)
			std::cout << "\t" << cloud->points[pointIndices[i]].x
					  << " " << cloud->points[pointIndices[i]].y
					  << " " << cloud->points[pointIndices[i]].z << std::endl;
	}

	// We will find the 5 nearest neighbors of the point.
	// This vector will store their squared distances to the search point.
    // このポイントの最近傍点を5個見つける。このベクトルは探索ポイントとの距離の自乗も記憶する
	std::vector<float> squaredDistances;
	if (octree.nearestKSearch(point, 5, pointIndices, squaredDistances) > 0)
	{
		std::cout << "5 nearest neighbors of the point:" << std::endl;
		for (size_t i = 0; i < pointIndices.size(); ++i)
			std::cout << "\t" << cloud->points[pointIndices[i]].x
					  << " " << cloud->points[pointIndices[i]].y
					  << " " << cloud->points[pointIndices[i]].z
					  << " (squared distance: " << squaredDistances[i] << ")" << std::endl;
	}

	// Now we find all neighbors within 3cm of the point
	// (inside a sphere of radius 3cm centered at the point).
	// The point DOES have to belong in the cloud.
    // このポイントから3cm以内のすべての近傍点(半径3cmの球の内側の点)を見つける
    // このポイントはクラウドの点でなければならない
	if (octree.radiusSearch(point, 0.03, pointIndices, squaredDistances) > 0)
	{
		std::cout << "Neighbors within 3cm:" << std::endl;
		for (size_t i = 0; i < pointIndices.size(); ++i)
			std::cout << "\t" << cloud->points[pointIndices[i]].x
					  << " " << cloud->points[pointIndices[i]].y
					  << " " << cloud->points[pointIndices[i]].z
					  << " (squared distance: " << squaredDistances[i] << ")" << std::endl;
	}
}
見てわかるように、このコードはkd-木のプログラムと互換性が高い
- 入力: ポイント、半径 | 近傍点数
- 出力: ポイントのインデックス、距離の2乗
- Tutorial: Spatial Partitioning and Search Operations with Octrees
- API:
- Download
圧縮/解凍
一方、PCLでポイントクラウドを圧縮したり解凍したりするために必要なコードは次のとおり:
#include <pcl/io/pcd_io.h>
#include <pcl/compression/octree_pointcloud_compression.h>
#include <boost/thread/thread.hpp>
#include <pcl/visualization/pcl_visualizer.h>

int
main(int argc, char** argv)
{
	// Objects for storing the point clouds.  ポイントクラウドの格納用オブジェクト
	pcl::PointCloud<pcl::PointXYZ>::Ptr cloud(new pcl::PointCloud<pcl::PointXYZ>);
	pcl::PointCloud<pcl::PointXYZ>::Ptr decompressedCloud(new pcl::PointCloud<pcl::PointXYZ>);

	// Read a PCD file from disk.  ハードディスクからPCDファイルを読み込む
	if (pcl::io::loadPCDFile<pcl::PointXYZ>(argv[1], *cloud) != 0)
	{
		return -1;
	}

	// Octree compressor object. 八分木圧縮オブジェクト
	// Check /usr/include/pcl-<version>/pcl/compression/compression_profiles.h for more profiles.
	// The second parameter enables the output of information.
    // 詳しくは /usr/include/pcl-<version>/pcl/compression/compression_profiles.h ファイル参照
    // 2番めのパラメタにより情報の出力が可能になる
	pcl::io::OctreePointCloudCompression<pcl::PointXYZ> octreeCompression(pcl::io::MED_RES_ONLINE_COMPRESSION_WITHOUT_COLOR, true);
	// Stringstream that will hold the compressed cloud. クラウドを圧縮したものを保持するための文字ストリーム
	std::stringstream compressedData;

	// Compress the cloud (you would save the stream to disk). クラウドを圧縮(これをハードディスクに格納する)
	octreeCompression.encodePointCloud(cloud, compressedData);

	// Decompress the cloud. クラウドの解凍
	octreeCompression.decodePointCloud(compressedData, decompressedCloud);

	// Display the decompressed cloud. 解凍したクラウドの表示
	boost::shared_ptr<pcl::visualization::PCLVisualizer> viewer(new pcl::visualization::PCLVisualizer("Octree compression"));
	viewer->addPointCloud<pcl::PointXYZ>(decompressedCloud, "cloud");
	while (!viewer->wasStopped())
	{
		viewer->spinOnce(100);
		boost::this_thread::sleep(boost::posix_time::microseconds(100000));
	}
}


(左) 元のポイントクラウド
(右) 八分木圧縮後に戻されたポイントクラウド
ご覧のように、このプロセスはクラウド内のポイントの量を減らす。 「OctreePointCloudCompression」オブジェクトのデフォルトのパラメータは、八分木の解像度(最低レベル)1cmと座標精度1mmを与える。 もちろん、これらの値は要求に合わせて変更できるが、このようにクラウドを単純化することは便利な操作であり、後で説明する。
- 入力: ポイント、解像度、圧縮プロファイル
- 出力: 圧縮ストリーム
- Tutorial: Point Cloud Compression
- API: pcl::io::OctreePointCloudCompression
- Download
変更の検出
PCLには、八分木に基づくオブジェクトがあり、2つのポイントクラウド(たとえば、OpenNIデバイスで2つのクラウドを1つずつ順番に取得する)間の変化を検出できる。 このオブジェクトは、両方のクラウドの木を同時に保存し、それらを比較して、2番目のクラウドにおいて新しく現れたポイントのインデックスのリストを返す(最初のものには存在しない)。
#include <pcl/io/pcd_io.h>
#include <pcl/octree/octree.h>

#include <iostream>

int
main(int argc, char** argv)
{
	// Objects for storing the point clouds.  ポイントクラウドの格納用オブジェクト
	pcl::PointCloud<pcl::PointXYZ>::Ptr cloudA(new pcl::PointCloud<pcl::PointXYZ>);
	pcl::PointCloud<pcl::PointXYZ>::Ptr cloudB(new pcl::PointCloud<pcl::PointXYZ>);

	// Read two PCD files from disk.  ハードディスクからPCDファイルを読み込む
	if (pcl::io::loadPCDFile<pcl::PointXYZ>(argv[1], *cloudA) != 0)
	{
		return -1;
	}
	if (pcl::io::loadPCDFile<pcl::PointXYZ>(argv[2], *cloudB) != 0)
	{
		return -1;
	}

	// Change detector object, with a resolution of 128
	// (resolution at lowest octree level).
    // 変化検出オブジェクト、解像度を128とする(最深八分木レベルでの解像度)
	pcl::octree::OctreePointCloudChangeDetector<pcl::PointXYZ> octree(128.0f);

	// Add cloudA to the octree.  cloudAを八分木に追加
	octree.setInputCloud(cloudA);
	octree.addPointsFromInputCloud();
	// The change detector object is able to store two clouds at the same time;
	// with this we can reset the buffer but keep the previous tree saved.
    // 変化検出オブジェクトは同時に2つのクラウドを記憶できる
    // これによりバッファをリセットしながら前の木を記憶したままにできる
	octree.switchBuffers();
	// Now, add cloudB to the octree like we did before. 今度はcloudBを八分木に追加
	octree.setInputCloud(cloudB);
	octree.addPointsFromInputCloud();

	std::vector<int> newPoints;
	// Get a vector with the indices of all points that are new in cloud B,
	// when compared with the ones that existed in cloud A.
    // クラウドBに新たに加わったポイントすべてのインデックスを持つベクトルを取得
    // クラウドAにあるポイントと比べて。
	octree.getPointIndicesFromNewVoxels(newPoints);
	for (size_t i = 0; i < newPoints.size(); ++i)
	{
		std::cout << "Point (" << cloudB->points[newPoints[i]].x << ", "
				  << cloudB->points[newPoints[i]].y << ", "
				  << cloudB->points[newPoints[i]].z
				  << ") was not in cloud A but is in cloud B" << std::endl;
	}
	std::cout << newPoints.size() << std::endl;
}
- 入力: 1番めのクラウド、2番めのクラウド、解像度
- 出力: ポイントのインデックス
- Tutorial: Spatial change detection on unorganized point cloud data
- API: pcl::octree::OctreePointCloudChangeDetector
- Download
フィルタリング
センサから返された生のポイントクラウドは、通常、処理アルゴリズムに渡される前に何らかの前処理が必要である。 通常、これはセンサーの精度が低いために必要であり、ノイズ、測定値の不正確さ、表面の穴などを引き起こす。時には反対のこともある。クラウドには多くのポイントがあるため、その処理には時間がかかりすぎる。 幸いにも、ポイントクラウドの多くの定期的なエラーを「修正」するためのフィルタリング方法がいくつかある。
パススルーフィルタ
パススルーフィルタを使用すると、値がユーザーが指定した特定の範囲にないポイントがクラウドから削除される。 たとえば3メートルよりも離れた点をすべて破棄したい場合は、Z座標に対し$[0,3]$の範囲でフィルタを実行する。 このフィルタは、不要なオブジェクトをクラウドから破棄するのに便利ですが、(センサに対して)デフォルトのものが適合しない場合は、別の参照フレームを適用する必要がある。 たとえば、テーブル上にないすべてのポイントを削除するためにY値をフィルタリングすると、カメラがおかしな角度にあった場合には望ましくない結果が得られるかもしれない。
#include <pcl/io/pcd_io.h>
#include <pcl/filters/passthrough.h>

int
main(int argc, char** argv)
{
	// Objects for storing the point clouds.  ポイントクラウドの格納用オブジェクト
	pcl::PointCloud<pcl::PointXYZ>::Ptr cloud(new pcl::PointCloud<pcl::PointXYZ>);
	pcl::PointCloud<pcl::PointXYZ>::Ptr filteredCloud(new pcl::PointCloud<pcl::PointXYZ>);

	// Read a PCD file from disk.  ハードディスクからPCDファイルを読み込む
	if (pcl::io::loadPCDFile<pcl::PointXYZ>(argv[1], *cloud) != 0)
	{
		return -1;
	}

	// Filter object.  フィルタ・オブジェクト
	pcl::PassThrough<pcl::PointXYZ> filter;
	filter.setInputCloud(cloud);
	// Filter out all points with Z values not in the [0-2] range.
    // Z値が[0-2]の範囲に「ない」すべてのポイントを見つけ出す
	filter.setFilterFieldName("z");
	filter.setFilterLimits(0.0, 2.0);

	filter.filter(*filteredCloud);
}


(左)元のポイントクラウド
(右)Zが$[0,2]$というパスフィルタを適用した結果のポイントクラウド
"setFilterLimitsNegative()"関数(この例にはない)は、範囲内の点( "false"、これがデフォルト値)またはその外側( "true")を返すかどうかをフィルタオブジェクトに通知する。
- 入力: ポイント、フィルタ領域、フィルタの範囲P (Negative mode)
- 出力: フィルタされたポイント
- Tutorial: Filtering a PointCloud using a PassThrough filter
- Download
条件付き除去
前の例とまったく同じ結果を得るもうひとつの方法は、条件付き除去フィルターを使用することである。 我々は、必要なポイントの値に対する条件を作ることができる。
#include <pcl/io/pcd_io.h>
#include <pcl/filters/conditional_removal.h>

int
main(int argc, char** argv)
{
	// Objects for storing the point clouds.  ポイントクラウドの格納用オブジェクト
	pcl::PointCloud<pcl::PointXYZ>::Ptr cloud(new pcl::PointCloud<pcl::PointXYZ>);
	pcl::PointCloud<pcl::PointXYZ>::Ptr filteredCloud(new pcl::PointCloud<pcl::PointXYZ>);

	// Read a PCD file from disk.  ハードディスクからPCDファイルを読み込む
	if (pcl::io::loadPCDFile<pcl::PointXYZ>(argv[1], *cloud) != 0)
	{
		return -1;
	}

	// We must build a condition. 条件を作成しなければならない
	// And "And" condition requires all tests to check true. "Or" conditions also available.
    // "And"条件はすべてtrueであることが必要、"Or"条件も使える
	pcl::ConditionAnd<pcl::PointXYZ>::Ptr condition(new pcl::ConditionAnd<pcl::PointXYZ>);
	// First test, the point's Z value must be greater than (GT) 0.
    // 最初のテスト。ポイントのZ値が0より大きい(GT)という条件
	condition->addComparison(pcl::FieldComparison<pcl::PointXYZ>::ConstPtr(new pcl::FieldComparison<pcl::PointXYZ>("z", pcl::ComparisonOps::GT, 0.0)));
	// Second test, the point's Z value must be less than (LT) 2.
    // 2番目のテスト。ポイントのZ値が2より小さい(LT)という条件
	condition->addComparison(pcl::FieldComparison<pcl::PointXYZ>::ConstPtr(new pcl::FieldComparison<pcl::PointXYZ>("z", pcl::ComparisonOps::LT, 2.0)));
	// Checks available: GT, GE, LT, LE, EQ.  --- 比較演算子としてGT, GE, LT, LE, EQが使える

	// Filter object. フィルタオブジェクト
	pcl::ConditionalRemoval<pcl::PointXYZ> filter;
	filter.setCondition(condition);
	filter.setInputCloud(cloud);
	// If true, points that do not pass the filter will be set to a certain value (default NaN).
	// If false, they will be just removed, but that could break the structure of the cloud
	// (organized clouds are clouds taken from camera-like sensors that return a matrix-like image).
    // trueならば、フィルタをパスしなかったポイントはある値(デフォルトはNaN)にセットされる
    // falseならば、単に除去されるが、クラウドの構造を壊す可能性がある
    // (組織化されたクラウドとは行列状の画像を返すカメラ的センサからのクラウドのこと)
	filter.setKeepOrganized(true);
	// If keep organized was set true, points that failed the test will have their Z value set to this.
    // setKeepOrganizedがtrueで設定されていれば、テストに合格しなかったポイントのZ値は以下になる
    filter.setUserFilterValue(0.0);

	filter.filter(*filteredCloud);
}
- 入力: ポイント、条件、(Keep organized)
- 出力: フィルターされたポイント
- Tutorial: Removing outliers using a Conditional or RadiusOutlier removal
- API: pcl::ConditionalRemoval
- Download
外れ値除去
外れ値は、迷惑な蚊のように、クラウドの中のどこかに広がっている孤独なポイントのことである。 これらは、センサの不正確さの結果であり、存在してはならない測定値をもっている。 外れ値は、例えば法線推定のような計算にエラーを導入する可能性があるため、望ましくないノイズとみなされる。 したがって、それらをクラウドから取り除いてしまえば、計算が高速になるだけでなく(ダウンサンプリングで見たように、ポイントが少ないほど、計算時間は少なくてすむ)、より正確な値を得ることができる。
半径に基づく方法
半径に基づく外れ値除去は、すべての中で最も簡単な方法である。 検索半径と、ポイントが外れ値としてラベル付けされるのを避けるべき最小の近傍点数を指定する必要がある。 このアルゴリズムはすべてのポイントを繰り返し実行し(そのためクラウドが大きい場合は遅くなる可能性がある)、チェックを実行する。指定された半径内に指定した近傍数より少ないポイントが見つかった場合は、それらを削除する。
#include <pcl/io/pcd_io.h>
#include <pcl/filters/radius_outlier_removal.h>

int
main(int argc, char** argv)
{
	// Objects for storing the point clouds.  ポイントクラウドの格納用オブジェクト
	pcl::PointCloud<pcl::PointXYZ>::Ptr cloud(new pcl::PointCloud<pcl::PointXYZ>);
	pcl::PointCloud<pcl::PointXYZ>::Ptr filteredCloud(new pcl::PointCloud<pcl::PointXYZ>);

	// Read a PCD file from disk.  ハードディスクからPCDファイルを読み込む
	if (pcl::io::loadPCDFile<pcl::PointXYZ>(argv[1], *cloud) != 0)
	{
		return -1;
	}

	// Filter object. フィルタオブジェクト
	pcl::RadiusOutlierRemoval<pcl::PointXYZ> filter;
	filter.setInputCloud(cloud);
	// Every point must have 10 neighbors within 15cm, or it will be removed.
    // どのポイントも15cm以内に10個以上の近傍点を持たなければならない、そうでなければ除去される
	filter.setRadiusSearch(0.15);
	filter.setMinNeighborsInRadius(10);

	filter.filter(*filteredCloud);
}
( "pcl :: RadiusOutlierRemoval"と同様)"pcl :: FilterIndices"を継承するすべてのPCLクラスは "setNegative()"関数がある。これをtrueに設定すると、フィルタを「通過しなかった」点を返す。
- 入力: ポイント、半径、近傍点数
- 出力: フィルターされたポイント
- Tutorial: Removing outliers using a Conditional or RadiusOutlier removal
- API: pcl::RadiusOutlierRemoval
- Download
統計的
統計的外れ値除去処理はもう少し洗練されている。 まず、すべての点について、そのK近傍への平均距離を計算する。 次に、結果が平均$\mu$と標準偏差$\sigm$の正規分布(ガウス分布)であると仮定すると、平均距離+偏差から外れる平均距離を持つすべての点を削除することが安全とみなされる。 基本的には、隣接点間の距離の統計分析を実行し、「正常」とはみなされないすべての点の削除を行う(アルゴリズムのパラメータで「通常」が何であるかを定義しておく)。
#include <pcl/io/pcd_io.h>
#include <pcl/filters/statistical_outlier_removal.h>

int
main(int argc, char** argv)
{
	// Objects for storing the point clouds.  ポイントクラウドの格納用オブジェクト
	pcl::PointCloud<pcl::PointXYZ>::Ptr cloud(new pcl::PointCloud<pcl::PointXYZ>);
	pcl::PointCloud<pcl::PointXYZ>::Ptr filteredCloud(new pcl::PointCloud<pcl::PointXYZ>);

	// Read a PCD file from disk.  ハードディスクからPCDファイルを読み込む
	if (pcl::io::loadPCDFile<pcl::PointXYZ>(argv[1], *cloud) != 0)
	{
		return -1;
	}

	// Filter object. フィルターオブジェクト
	pcl::StatisticalOutlierRemoval<pcl::PointXYZ> filter;
	filter.setInputCloud(cloud);
	// Set number of neighbors to consider to 50. 考慮すべき近傍点の個数を50に
	filter.setMeanK(50);
	// Set standard deviation multiplier to 1.
	// Points with a distance larger than 1 standard deviation of the mean distance will be outliers.
    // 標準偏差(sigma)の倍率を1に設定。平均から1 sigma以上離れた距離のポイトを外れ値とする
	filter.setStddevMulThresh(1.0);

	filter.filter(*filteredCloud);
}
このフィルタでも"setNegative()"を使うことができる。
- 入力: ポイント、近傍点数、偏差乗数
- 出力: フィルターされたポイント
- Tutorial: Removing outliers using a StatisticalOutlierRemoval filter
- API: pcl::StatisticalOutlierRemoval
- Download
リサンプリング
リサンプリングとは、クラウドのポイント数を減らす(ダウンサンプリングする)か、または増加させる(アップサンプリングする)ことを意味する。どちらにもそれぞれ目的がある。
ダウンサンプリング
KinectやXtionのようなセンサーは、307200(640x480)ポイントクラウドを生成する。これには多くの情報が含まれている。また、新しいKinectもすでに出荷され、より高い解像度で動いている。クラウドのあらゆるポイントで簡単な操作を実行すると、nをポイント数として、$O(n)$の計算量になる。すべての点をk最近傍点と比較するとすれば計算量は$O(nk)$である。ここで紹介したアルゴリズムのいくつかは、あなたのPC上で実行するのに数秒かかったことでしょうが、もうその理由がわかったことだろう。
PCLがコンピュータのGPU(グラフィックカード)を使いCUDAによって計算実行できるよう最適化手法が実装されている。多くのクラスが "pcl::gpu"名前空間に代替手段を提供している。これはスピードの劇的な改善をもたらすが、必ずしもそうだとは限らない。
もう1つの選択肢は、クラウドの複雑さを減らすことである。つまり、目的達成に不要な点をすべて削除することである。これにはいくつかの方法がある。クラウドからすべての外れ値を整理し、分割を実行して興味のある部分だけを抽出することができる。一般的な操作としてダウンサンプリングが行われる。これにより、ポイント数が少ないものの元のものと同等の目的が実行できるクラウドが得られる。
ダウンサンプリングは、「ボクセル化」によって行われる。既に八分木の節でボクセルとはどのようなものかを説明した。クラウドは、望んだ解像度で複数の立方体形状の領域に分割される。そして、各ボクセル内の点は1つを除いて処理される。そのための最も簡単な方法は、ランダムに一つの点を選択することだが、重心を計算する方がより正確である。ここで重心とは座標がボクセルに属するすべての点の平均値の点のことである。
実用的なパラメータを使用すれば、ダウンサンプリングにより、CPUパワーが低下しても十分に正確な結果が得られる。
ボクセルグリッド
クラウドをダウンサンプリングする簡単な方法は次の通り:
#include <pcl/io/pcd_io.h>
#include <pcl/filters/voxel_grid.h>

int
main(int argc, char** argv)
{
	// Objects for storing the point clouds.  ポイントクラウドの格納用オブジェクト
	pcl::PointCloud<pcl::PointXYZ>::Ptr cloud(new pcl::PointCloud<pcl::PointXYZ>);
	pcl::PointCloud<pcl::PointXYZ>::Ptr filteredCloud(new pcl::PointCloud<pcl::PointXYZ>);

	// Read a PCD file from disk.  ハードディスクからPCDファイルを読み込む
	if (pcl::io::loadPCDFile<pcl::PointXYZ>(argv[1], *cloud) != 0)
	{
		return -1;
	}

	// Filter object. フィルターオブジェクト
	pcl::VoxelGrid<pcl::PointXYZ> filter;
	filter.setInputCloud(cloud);
	// We set the size of every voxel to be 1x1x1cm
	// (only one point per every cubic centimeter will survive).
    // どのボクセルのサイズも 1 x 1 x 1 cmとする(1 立方センチメートルの立方体あたり1個だけ残す)
	filter.setLeafSize(0.01f, 0.01f, 0.01f);

	filter.filter(*filteredCloud);
}


(左)元のポイントクラウド
(右)葉のサイズを1cmとしてダウンサンプリングした結果のポイントクラウド
- 入力: ポイント、ボクセルのサイズ
- 出力: ダウンサンプリングされたクラウド
- Tutorial: Downsampling a PointCloud using a VoxelGrid filter
- API: pcl::VoxelGrid
- Download
#include <pcl/io/pcd_io.h>
#include <pcl/keypoints/uniform_sampling.h>

int
main(int argc, char** argv)
{
	// Objects for storing the point clouds.  ポイントクラウドの格納用オブジェクト
	pcl::PointCloud<pcl::PointXYZ>::Ptr cloud(new pcl::PointCloud<pcl::PointXYZ>);
	pcl::PointCloud<pcl::PointXYZ>::Ptr filteredCloud(new pcl::PointCloud<pcl::PointXYZ>);

	// Read a PCD file from disk.  ハードディスクからPCDファイルを読み込む
	if (pcl::io::loadPCDFile<pcl::PointXYZ>(argv[1], *cloud) != 0)
	{
		return -1;
	}

	// Uniform sampling object.  一様サンプリング・オブジェクト
	pcl::UniformSampling<pcl::PointXYZ> filter;
	filter.setInputCloud(cloud);
	// We set the size of every voxel to be 1x1x1cm
	// (only one point per every cubic centimeter will survive).
    // どのボクセルのサイズも 1 x 1 x 1 cmとする(1 立方センチメートルの立方体あたり1個だけ残す)
	filter.setRadiusSearch(0.01f);
	// We need an additional object to store the indices of surviving points.
    // 残されたポイントのインデックスを記憶するために追加のオブジェクトが必要
	pcl::PointCloud<int> keypointIndices;

	filter.compute(keypointIndices);
	pcl::copyPointCloud(*cloud, keypointIndices.points, *filteredCloud);
}
- 入力: ポイント、ボクセルのサイズ
- 出力: ポイントのインデックス
- API: pcl::UniformSampling
- Download
アップサンプリング
アップサンプリングは表面再構成の一種であるが、ここに含めておく。ポイント数が望む個数よりも少ない場合に、アップサンプリングは補間によって元の表面形状を回復するのに役立つ。これは単なる洗練された推定でしかない。 結果は決して100%正確ではないが、時にはそれが唯一の選択肢のこともある。 だから、ポイントクラウドをダウンサンプリングする前に、元のデータのコピーを保持するようにしよう!
PCLではこのためにMoving Least Squares(MLS)アルゴリズムを使用している。 コードは次のようになる。
#include <pcl/io/pcd_io.h>
#include <pcl/surface/mls.h>

int
main(int argc, char** argv)
{
	// Objects for storing the point clouds.  ポイントクラウドの格納用オブジェクト
	pcl::PointCloud<pcl::PointXYZ>::Ptr cloud(new pcl::PointCloud<pcl::PointXYZ>);
	pcl::PointCloud<pcl::PointXYZ>::Ptr filteredCloud(new pcl::PointCloud<pcl::PointXYZ>);

	// Read a PCD file from disk.  ハードディスクからPCDファイルを読み込む
	if (pcl::io::loadPCDFile<pcl::PointXYZ>(argv[1], *cloud) != 0)
	{
		return -1;
	}

	// Filtering object.  フィルターオブジェクト
	pcl::MovingLeastSquares<pcl::PointXYZ, pcl::PointXYZ> filter;
	filter.setInputCloud(cloud);
	// Object for searching. 探索のためのオブジェクト
	pcl::search::KdTree<pcl::PointXYZ>::Ptr kdtree;
	filter.setSearchMethod(kdtree);
	// Use all neighbors in a radius of 3cm.  半径3cm内の近傍点すべてを用いる
	filter.setSearchRadius(0.03);
	// Upsampling method. Other possibilites are DISTINCT_CLOUD, RANDOM_UNIFORM_DENSITY
	// and VOXEL_GRID_DILATION. NONE disables upsampling. Check the API for details.
    // アップサンプリング手法としては他に: DISTINCT_CLOUD, RANDOM_UNIFORM_DENSITY,VOXEL_GRID_DILATION
    // NONEを指定すればアップサンプリングができなくなる。詳細はAPI参照
	filter.setUpsamplingMethod(pcl::MovingLeastSquares<pcl::PointXYZ, pcl::PointXYZ>::SAMPLE_LOCAL_PLANE);
	// Radius around each point, where the local plane will be sampled.
    // それぞれのポイントからの半径、ここで局所平面がサンプルされる
	filter.setUpsamplingRadius(0.03);
	// Sampling step size. Bigger values will yield less (if any) new points.
    // サンプリングのスッテプサイズ。大きい値ほど生成されるポイントが少なくなる
	filter.setUpsamplingStepSize(0.02);

	filter.process(*filteredCloud);
}


(左)元のポイントクラウド (右)葉のサイズが1cmのダウンサンプリング


(左)SAMPLE_LOCAL_PLANEによるアップサンプリング (右)RANDOM_UNIFORM_DENSITY によるアップサンプリング
setUpsamplingMethod() APIをチェックして、使用可能なすべてのアップサンプリング・メソッドと、それらを機能させるために設定する必要のあるパラメータを確認しておこう。
- 入力: ポイント、探索半径、アップサンプリング・メソッド、(アップサンプリング・パラメタ)
- 出力: アップサンプルされたクラウド
- API: pcl::MovingLeastSquares
- Download
#include <pcl/io/pcd_io.h>
#include <pcl/surface/mls.h>

int
main(int argc, char** argv)
{
	// Object for storing the point cloud.  ポイントクラウドの格納用オブジェクト
	pcl::PointCloud<pcl::PointXYZ>::Ptr cloud(new pcl::PointCloud<pcl::PointXYZ>);
	// The output will also contain the normals.
	pcl::PointCloud<pcl::PointNormal>::Ptr smoothedCloud(new pcl::PointCloud<pcl::PointNormal>);

	// Read a PCD file from disk.  ハードディスクからPCDファイルを読み込む
	if (pcl::io::loadPCDFile<pcl::PointXYZ>(argv[1], *cloud) != 0)
	{
		return -1;
	}

	// Smoothing object (we choose what point types we want as input and output).
    // 平滑化オブジェクト(入力と出力として用いるポイント型を選ぶ)
	pcl::MovingLeastSquares<pcl::PointXYZ, pcl::PointNormal> filter;
	filter.setInputCloud(cloud);
	// Use all neighbors in a radius of 3cm. 半径3cm内の全近傍点を用いる
	filter.setSearchRadius(0.03);
	// If true, the surface and normal are approximated using a polynomial estimation
	// (if false, only a tangent one).
    // trueならば表面と法線を多項式近似で推定(falseならば接線のみ)
	filter.setPolynomialFit(true);
	// We can tell the algorithm to also compute smoothed normals (optional).
    // (選択可能)平滑化法線の計算も可能
	filter.setComputeNormals(true);
	// kd-tree object for performing searches.  探索のためのkd木オブジェクト
	pcl::search::KdTree<pcl::PointXYZ>::Ptr kdtree;
	filter.setSearchMethod(kdtree);

	filter.process(*smoothedCloud);
}
出力クラウドには、よりスムーズなクラウドの改善された法線も含まれる。
- 入力: ポイント、探索半径、(多項式解析), (法線計算)
- 出力: 平滑化したクラウド、(平滑化した法線)
- Tutorial: Smoothing and normal estimation based on polynomial reconstruction
- API: pcl::MovingLeastSquares
- Download
Go to root: PhD-3D-Object-Tracking
Links to articles:
PCL/OpenNI tutorial 0: The very basics
PCL/OpenNI tutorial 1: Installing and testing
PCL/OpenNI tutorial 2: Cloud processing (basic)
PCL/OpenNI tutorial 3: Cloud processing (advanced)
PCL/OpenNI tutorial 4: 3D object recognition (descriptors)
PCL/OpenNI tutorial 5: 3D object recognition (pipeline)
PCL/OpenNI troubleshooting